Ending 1B RTA
Revision #32 by electra, 
Rules:
- Time Starts: Upon selecting "NEW GAME" on the title screen.
- Time Stops: When the ending screen has fully faded in after the credits.
- Extra Rules:
- You may not have an existing WORLDEGG.rxdata file. The run must be completed on a fresh copy of the game.
Route:
Opening Scenes
Black Box Tutorial:
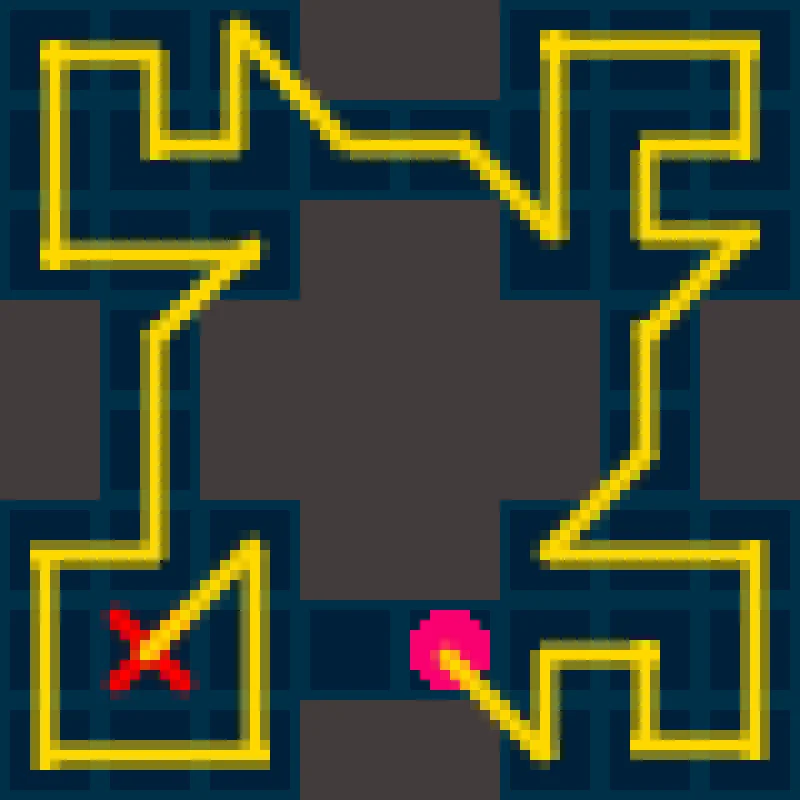
- Go through normally until you are shown the automap.
- For Auto-Map Tutorial, follow the movement displayed in the image.
- Skip a dialog near the hole and the strafing tutorial by making a beeline towards the secret door.
Master Seed:
- Set the Master Seed to
1000and confirm.
Questionaire:
- To get Oracle as your starting Minotaur Archetype, select Yes or No in the order they are presented to you.
- SKY:
Y, Y, N, Y, N, Y, Y, Y, Y, Y, Y, N, Y, Y - DARKNESS:
N, Y, N, N, Y, N, Y, Y, Y, Y, Y, N, Y, Y
- SKY:
Lethe
Lethe Courtyard
- Go forward to Northern Door
Lethe 1F:
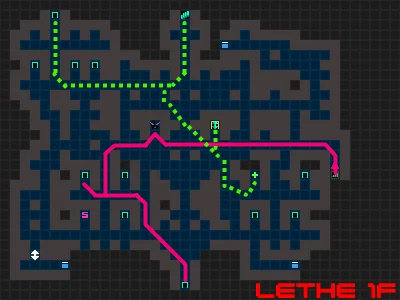
- Get "Mage.prg".
- Form Party:
| 0 | 1 | 2 |
|---|---|---|
| Lolita Knight | Corrector | |
| Bondage Paladin | Bullet Witch | Oracle |
- Before you get an encounter, equip "Mage.prg" on Oracle.
- Head to Eastern stairs to BF1.
Lethe B1F:
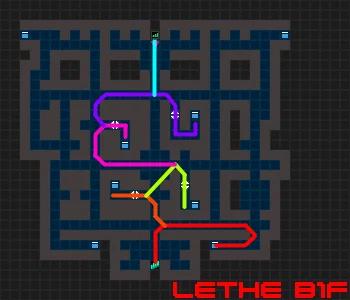
- Pick up Southwest chest which contains "Reanimator.i".
- Go North until 2nd set of tiles where you can go left and right, go left through the hidden door to get "Upgrade.i".
- Head North to 3x3 and go East and South to the next hidden door to get "S-Medical.i"
- Head West and North to go through the next hidden door to get "Alchemy.i".
- Head North then East just past the pathway to the stairs to go through another hidden door and pick up the "Priest.prg".
- EQUIP: "Priest.prg" on Knight and have her heal.
- Head North to stairs to B2F.
Lethe B2F:
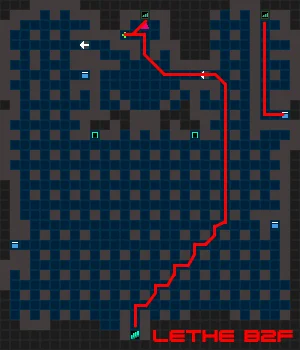
- Head Northeast to hidden door.
- Take a heal at the Healing Fountain near the stairs.
- SHOP: Buy 1x "Reanimator.i".
- Diagonal Strafe into the stairs to head to Lethe B3F.
Lethe B3F
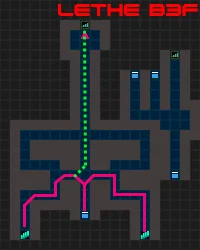
- Head to South Central chest to get "Reanimator.i".
- Go down Southeast stairs to go back to B2F.
Lethe B2F (2):
- Go South to treasure cube containing "Alchemy.i".
- Strafe Left to re-enter the stairs back to B3F.
Lethe B3F (2):
- Head back to the South West stairs that lead to the Healing Fountain.
- Grind to Lvl 3 on all party members here if you can.
Lethe B2F (3):
- Heal at the Healing Fountain.
- SHOP: Buy 1x "Reanimator.i".
- Diagonal Strafe into the stairs to head to Lethe B3F.
Lethe B3F (3):
- ARCHETYPE: Paladin "@Sword" Skill.
- ARCHETYPE: Oracle "@Info:HP" Skill.
- UNEQUIP: "Princess.swd" on Knight.
- EQUIP: "Princess.swd" on Paladin.
- Head to North Central path to fight Puppeteer.
Boss #1: Puppeteer
- Knight uses "Medeor.r", defends, or attacks 1HP Gazer.
- Corrector uses "Auto-Medic" on backline, or attacks 1HP Gazer
- Prioritize: Oracle, Witch, Paladin
- Paladin attacks Puppeteer, and Gazers when they are animated back with 1HP
- Witch uses "Magus Bullet" into Gazers while there are more than 1 on the field, then targets Puppeteer
- Oracle uses "Ignis.d" into Gazers while there are more than 2 on the field, then targets Puppeteer
| Key | Value |
|---|---|
| Name | Puppeteer |
| HP | 240 |
| Sprite |  |
- OPTIONAL: Head back to B2F to get 1 last free heal before it starts costing money (RECOMMENDED).
Lethe B4F:
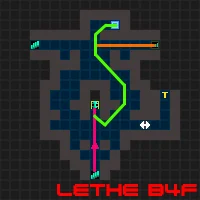
- Head forward to speak with Seras.
- Continue forward toward the Elevator and head to Lethe 5F.
Lethe 5F:

Text sits level with the top of the image and wraps beneath it.