Ending 1B RTA
Revision #66 by electra, 
Rules:
- Time Starts: Upon selecting "NEW GAME" on the title screen.
- Time Stops: When the ending screen has fully faded in after the credits.
- Extra Rules:
- You may not have an existing WORLDEGG.rxdata file. The run must be completed on a fresh copy of the game.
Route:
Opening Scenes
Black Box Tutorial:
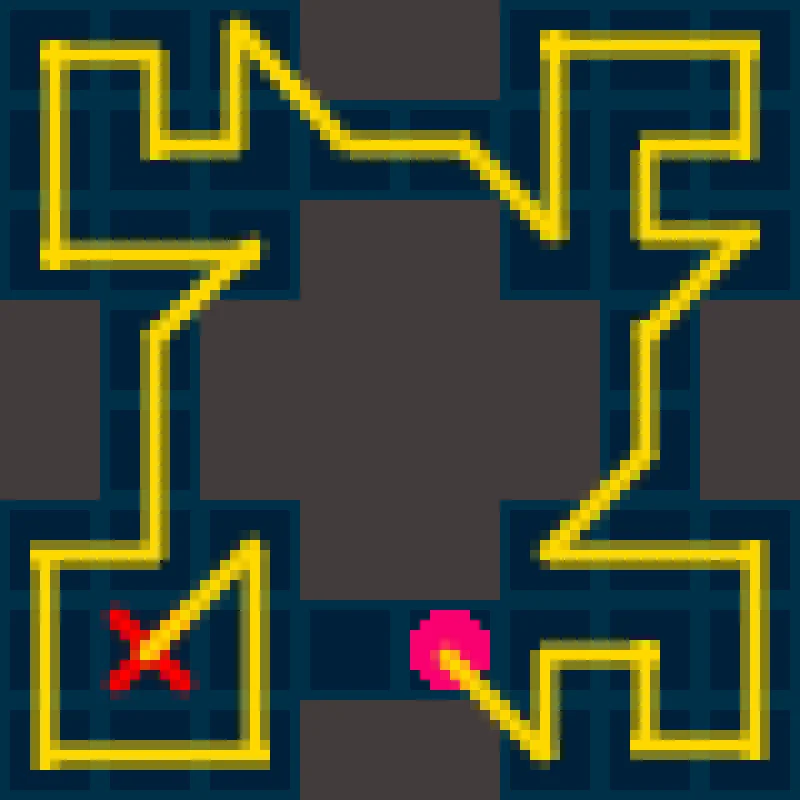
- Go through normally until you are shown the automap.
- For Auto-Map Tutorial, follow the movement displayed in the image.
- Skip a dialog near the hole and the strafing tutorial by making a beeline towards the secret door.
Master Seed:
- Set the Master Seed to
1000and confirm.
Questionaire:
- To get Oracle as your starting Minotaur Archetype, select Yes or No in the order they are presented to you.
- SKY:
Y, Y, N, Y, N, Y, Y, Y, Y, Y, Y, N, Y, Y - DARKNESS:
N, Y, N, N, Y, N, Y, Y, Y, Y, Y, N, Y, Y
- SKY:
Lethe
Lethe Courtyard
- Go forward to Northern Door
Lethe 1F:
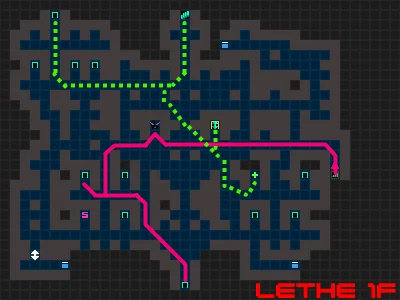
- Get "Mage.prg".
- Form Party:
| 0 | 1 | 2 |
|---|---|---|
| Lolita Knight | Corrector | |
| Bondage Paladin | Bullet Witch | Oracle |
- Before you get an encounter, equip "Mage.prg" on Oracle.
- Head to Eastern stairs to BF1.
Lethe B1F:
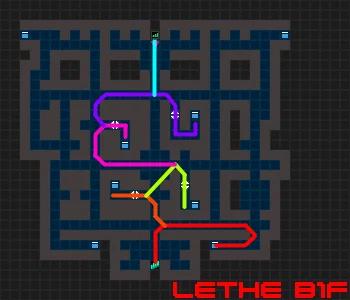
- Pick up Southwest chest which contains "Reanimator.i".
- Go North until 2nd set of tiles where you can go left and right, go left through the hidden door to get "Upgrade.i".
- Head North to 3x3 and go East and South to the next hidden door to get "S-Medical.i"
- Head West and North to go through the next hidden door to get "Alchemy.i".
- Head North then East just past the pathway to the stairs to go through another hidden door and pick up the "Priest.prg".
- EQUIP: "Priest.prg" on Knight and have her heal.
- Head North to stairs to B2F.
Lethe B2F:
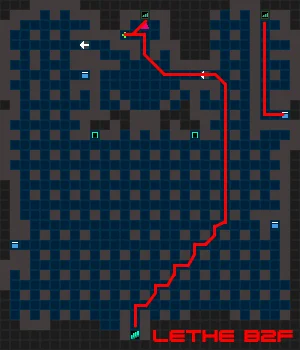
- Head Northeast to hidden door.
- Take a heal at the Healing Fountain near the stairs.
- SHOP: Buy 1x "Reanimator.i".
- Diagonal Strafe into the stairs to head to Lethe B3F.
Lethe B3F
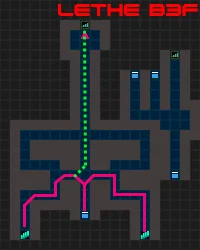
- Head to South Central chest to get "Reanimator.i".
- Go down Southeast stairs to go back to B2F.
Lethe B2F (2):
- Go South to treasure cube containing "Alchemy.i".
- Strafe Left to re-enter the stairs back to B3F.
Lethe B3F (2):
- Head back to the South West stairs that lead to the Healing Fountain.
- Grind to Lvl 3 on all party members here if you can.
Lethe B2F (3):
- Heal at the Healing Fountain.
- SHOP: Buy 1x "Reanimator.i".
- Diagonal Strafe into the stairs to head to Lethe B3F.
Lethe B3F (3):
- ARCHETYPE: Paladin "@Sword" Skill.
- ARCHETYPE: Oracle "@Info:HP" Skill.
- UNEQUIP: "Princess.swd" on Knight.
- EQUIP: "Princess.swd" on Paladin.
- Head to North Central path to fight Puppeteer.
Boss #1: Puppeteer
- Knight uses "Medeor.r", defends, or attacks 1HP Gazer
- Corrector uses "Auto-Medic" on backline, or attacks 1HP Gazer
- Prioritize: Oracle, Witch, Paladin
- Paladin attacks Puppeteer, and Gazers when they are animated back with 1HP
- Witch uses "Magus Bullet" into Gazers while there are more than 1 on the field, then targets Puppeteer
- Oracle uses "Ignis.d" into Gazers while there are more than 2 on the field, then targets Puppeteer
| Key | Value |
|---|---|
| Name | |
| HP | 240 |
| Sprite |  |
- OPTIONAL: Head back to B2F to get 1 last free heal before it starts costing money (RECOMMENDED).
Lethe B4F:
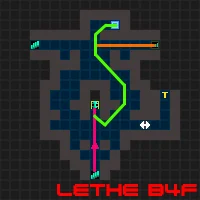
- Head forward to speak with Seras.
- Continue forward toward the Elevator and head to Lethe 5F.
Lethe 5F:
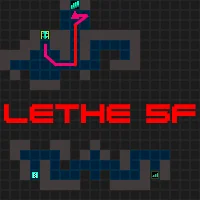
- Head to the 6F Stairs and watch the Phantom Minotaur cutscene.
Lethe 6F:
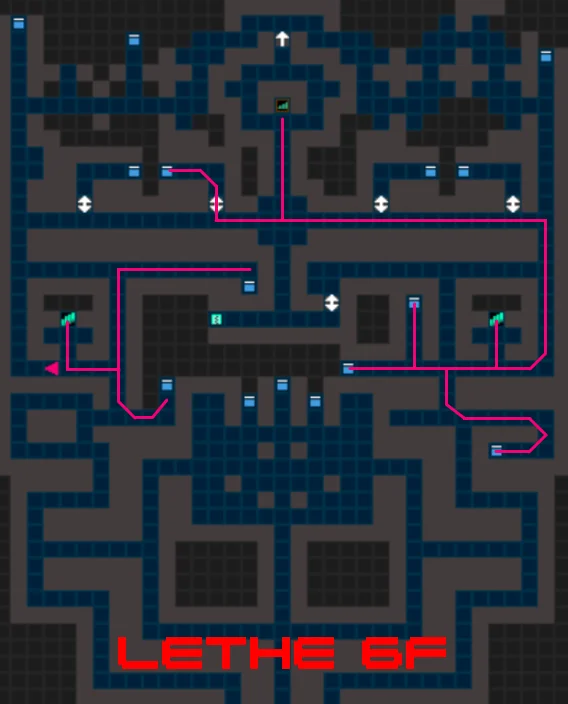
- North West hidden door TC contains "Upgrade.i".
- Cube closest to Eastern Stairs contains "200K".
- Cube second closest to Eastern Stairs contains "Medical.i".
- Cube South of Eastern Stairs contains "CrestGazer.swd".
- EQUIP (Swap): Paladin's "Cross.ktn" with "CrestGazer.swd"
- Head to Eastern Stairs to go to Lethe 7F.
Lethe 7F:
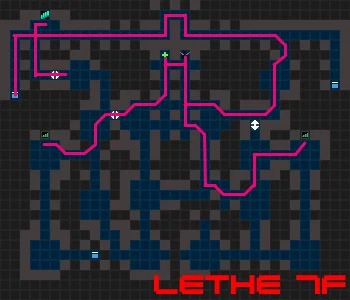
- Head to the center of the floor where the Unconscious and Healing Fountain are.
- Enter the Unconsciousness and leave to set Return.i point.
- Heal at Healing Fountain,
- BUY: stock up on "Reanimator.i" and buy 1x "Return.i"
- Open the hidden door to the West and head down West Stairs.
Lethe 6F (2):
- NOTE: This is kinda where you want all of your party members to be at Lvl 4.
- Cube North of Western Stairs contains "Alchemy.i".
- Cube South of Western Stairs contains "Reanimator.i".
- Use "Return.i"
Lethe 7F (2):
- Make your way toward the northern stairs. Get the "Return.i" in the Northwest Treasure Cube and then open up the hidden door.
- You want to be roughly halfway to Lvl 5 on all party members.
- Go up the stairs to 8F.
Lethe 8F:
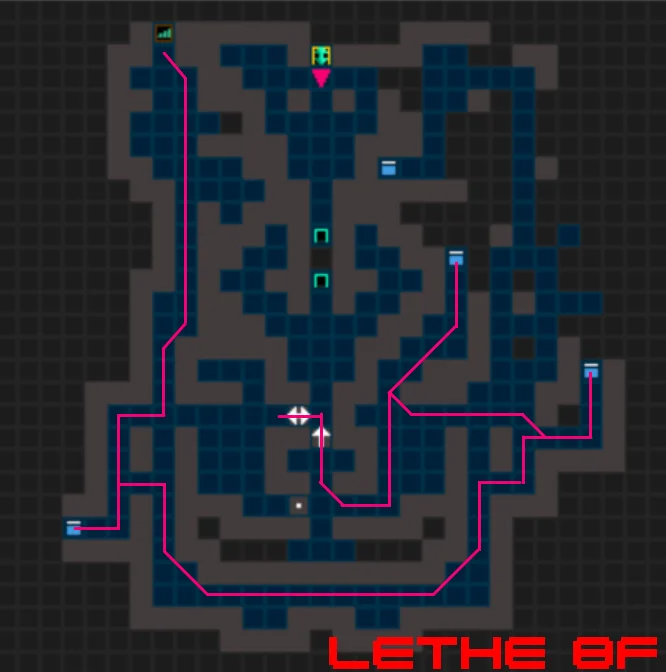
- South West TC contains "S-Medical.i".
- East most TC contains "Alchemy.i".
- Central TC contains "Healing Chain.i".
- Unlock the two hidden doors that lead to Pygmalion.
- Use "Return.i"
Lethe 7F (3):
- Grind to lvl 5 on all party members.
- Heal at Healing Fountain.
- Return to 8F.
Lethe 8F (2):
- Use the hidden doors to get right outside of Pygmalion's studio.
- ARCHETYPE: Give Corrector "Quarantine" and "Auto-Reboot" Skills.
- ARCHETYPE: Give Paladin "Shadow to Shadow" Skill.
- EQUIP: "Priest.prg" on Knight.
- Enter Pygmalion's studio.
Boss #2: Pygmalion's Golem
- Knight: Defends and casts "Medeor.r"
- Corrector: Uses "Auto-Reboot" on Witch and Oracle and "Auto-Medic" on Knight
- T1 Auto-Medic -> Knight and after start doing Auto-Reboot to Oracle then Witch
- Paladin: Uses "Shadow to shadow" and also dies probably
- Witch: Uses "Magus Bullet"
- Oracle: Uses "Ignis.d"
| Key | Value |
|---|---|
| Name | |
| HP | 445 |
| Sprite |  |
- Use a "Reanimator.i" to revive Paladin, and heal every other alive party member.
- Head to Lethe 10F
Lethe 10F:
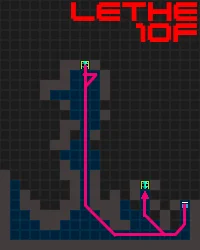
- Treasure Cube contains "Upgrade.i"
- Head to Grand Lift I for a short scene and then back the way you came to trigger a cutscene with Seras. She will give you the "Chisel.key".
- Head back to the first elevator and go to 3F.
Lethe 3F:
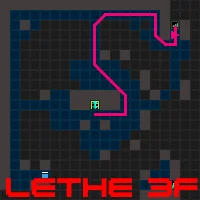
- Take the North route to the stairs to 2F.
Lethe 2F:
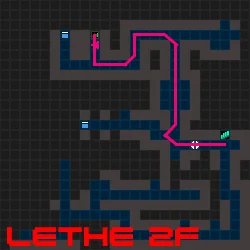
- Go through the hidden door, turn right then walk up and toward the stairs
Lethe 1F (2):
- Go to the Black Priestess' room to get the "Blessing.key".
- Grab the "Upgrade.i" from the NPC in front of the elevator.
- Heal at Healing Fountain.
- BUY: 10x Antidote and 2x Reanimator
- OPTIONAL: Save
- Go to B4F via the Elevator
Lethe B4F (2):
- Skip Seras cutscene by doing a diagonal strafe against the wall facing East.
- Head North to the Forum.
Forum:
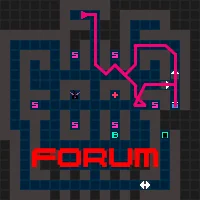
- Head to the closest merchant to the East.
- SELL: "Cross.ktn" and any ".dat" items.
- Head to Central Eastern merchant.
- BUY: "Bishop.prg" and "Psionic.prg".
- Go through Eastern hidden door to get "Upgrade.i".
- Leave the Forum and return to Lethe B4F.
Lethe B4F (3):
- Head East toward the stairs to Lethe B5F (Strafe into the door).
Lethe B5F:
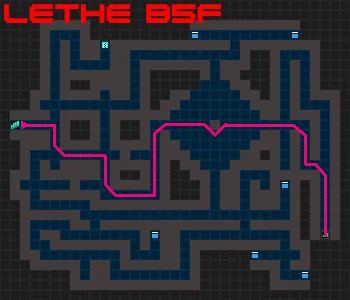
- Head to B6F.
Lethe B6F:
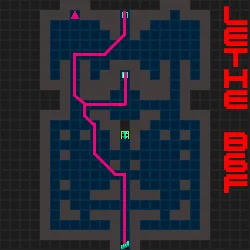
- Go to Styx.
Styx 1F:
- Get the "Jar.key"
- Leave and never come back.
Lethe B6F (2):
- After the cutscene with Seras, head back to B5F.
Lethe B5F (2):
- Visit the Courtyard again to speak with Lilim.
- DIALOG: Say "No" then say "Yes".
- Head back to B6F.
Lethe B6F (3):
- Head to the Sigil in the center of the room.
- EQUIP: Corrector with "Bishop.prg".
- EQUIP: Oracle with "Psionic.prg".
- EQUIP Paladin with "Mage.prg"
Boss #3: Chimera Wyrm
- Knight:
- Defends and uses "Medeor.r"
- If Corrector/Witch/Oracle die, uses "Reanimator.i", uses "Alchemy.i" on Oracle when her MP is low.
- Uses "Antidote.i" on turns that Chimera Wyrm used "Chimera Infect"
- Corrector: Uses "Vis.d" and "Medeor.r"
- Paladin: Uses "Ignis.d", Antidotes poisoned allies, uses "Alchemy.i" on Oracle when her MP is low, and also dies probably
- Witch: Uses "Magus Bullet"
- Oracle: Uses "Mind Duel"
| Key | Value |
|---|---|
| Name | |
| HP | 444 |
| Sprite |  |
- Enter the door to the backstage.
U_LH0035A:
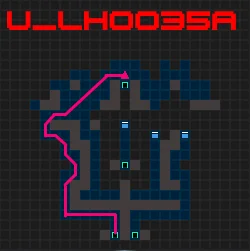
- Head to U_XX00XXA.
U_XX00XXA:
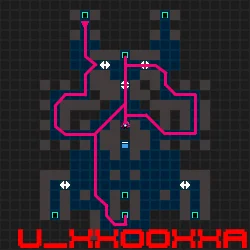
- Talk to Lilim.
- Inspect the blocked hidden door on your immediate left.
- Visit Velvet's Archive.
- After talking to Lilim again, inspect the blocked hidden door directly in front of you.
- Now head East to inspect the last hidden door that leads to Velvet.
- Lilim will push you into the blocked area.
- Side strafe into the door to skip the memory.
U_LH0035A (2):
- Go to the Treasure Cube and get "Strange Data.key
- Go back through the door.
U_XX00XXA (2):
- Head back to Velvet's Archive through the Southern hidden door to collect "Labrys.key".
- Head to U_XX00XXB
U_XX00XXB:
- Use the "Labrys.key" on the Sigil.
- Do a Diagonal Strafe 1 tile north of the fork to skip a Lilim cutscene.
- Head left in the fork to go to The Crypt of Popes.
Crypt of Popes B1F:
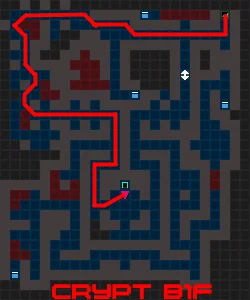
- DONT SKIP ANY PHANTOM MINOTAUR OR CUTSCENES OR YOU WILL NOT GET THE CUTSCENE HERE WITH PHANTOM!!!!
- After the Phantom Minotaur cutscene, head to B2F.
Crypt of Popes B1F:
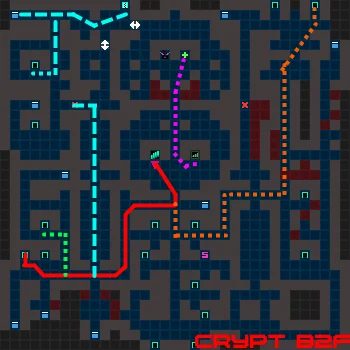
- To find the Phantom, You will either get very lucky or very unlucky with which door she picks to hide in. But when you do find here, choose to break the "Jar.key".
- DIALOG: Yes, No, Yes
- Head to the Western trap door.
Crypt B3F:
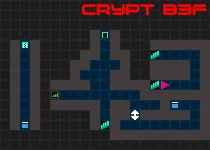
- Head to the Treasure Cube to get the "Battler.axe".
- Enter the Sigil.
U_CR00078G:
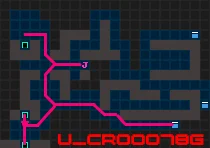
- Skip Lilim's Blackbox by doing a diagonal strafe toward's Jiji's Junk Shop.
- Enter the Junk Shop.
- SELL: Cross.ktn, Battler.axe, Sulphur.dat (GET: 700K)
- CONVERSION: Given that you have around 5,000MEM by Jiji, you can totally convert the "Life Chain.i" into "Life Chain.opt" making one of your dolls practically immortal as long as there is another doll alive in your party since it will reanimate the doll if it is dead. NOTE: This is not required, but it might make you more comfortable for Golden Machine. (COST: 4000MEM)
- GRINDING: 4 2x Puppet encounters should get everyone to Lvl 6.
- Get "Upgrade.i" from Southeast TC.
- Now you are at a crossroads, if you have the money, you should go to the Forum and buy stuff you will need for the rest of the Crypt as well as for the Golden Machine fight, but if you cannot do that now, you can do it right after you fight Hundred Faces. For the sake of my sanity, I will include it in the notes right now.
Forum (2):
- Head to the merchant by the Unconscious.
- BUY: 1x "Floating.i", and around 10x "Reboot.i"
- Head back to the Crypt.
Crypt B2F (3):
- Head West to TC containing "Heavy.shd".
- EQUIP: Knight with "Heavy.shd".
- Enter door directly South of the cube for the 1st Reliquary.
- Enter Northmost door in Southwest area for the 2nd Reliquary.
- Head South then East at the 2nd fork. Go north and then enter the Eastern door for the 3rd Reliquary.
- OPTIONAL: After the Phantom cutscene go North to heal at the Healing Fountain.
- Head back to where the last cutscene was and get an encounter to fight Hundred Faces.
Boss #4: Hundred Faces
- Knight: Defends and casts "Medeor.r"
- Corrector: Uses "Auto-Reboot" on Witch and "Auto-Medic" on Knight
- T1 Auto-Medic -> Knight and after start doing "Auto-Reboot" to Witch
- At low health, "Vis.d"
- Paladin: Uses "Shadow to shadow" and also dies probably
- Witch: Uses "Magus Bullet"
- Oracle: Uses "Ignis.d"
| Key | Value |
|---|---|
| Name | |
| HP | 612 |
| Sprite |  |
- EQUIP: Paladin with "Gladius.swd".
- Head West to closest Bishop Reliquary to get access to B4F.
- Heal at Healing Fountain.
- Head to B3F.
Crypt B3F (2):
- Go past the guard to get to B4F.
Crypt B4F:
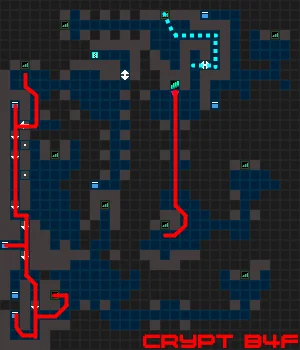
- Head South then East toward stairs.
Crypt B5F:
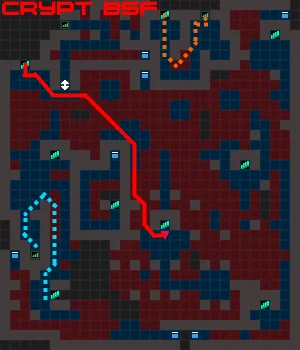
- Use "Floating.i".
- Head Northwest to the stairs in the Northwest corner.
Crypt B4F (2):
- Enter hidden door South of the stairs.
- Get "Rattling.ktn" from TC.
- Head South through 3 hidden doors.
- Go through South hidden door and grab an "Upgrade.i" from the TC.
- Head South through 2 more hidden doors and grab "Reanimator.i" from the TC.
- Go back East and then go to stairs immediately on your left to go back down to B5F.
Crypt B5F (2):
- Head North to the fork.
- Head directly South to stairs that lead to B6F.
Crypt B6F:
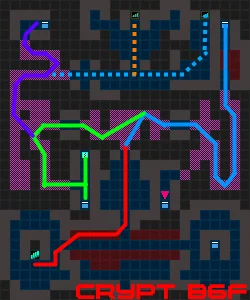
- Northeast TC: "NightLight.opt"
- Southwest TC: "HeavyMetal.swd"
- Enter Sigil door to U_CR0037H.
U_CR0037H:
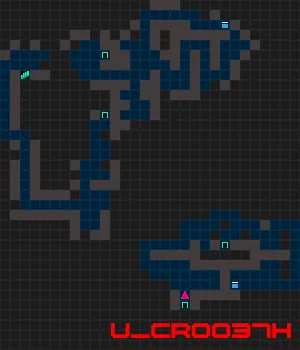
- Go Southeast to get "Shearing.swd".
- Go through the Northern door to U_XX0XTRX.
U_XX0XTRX:
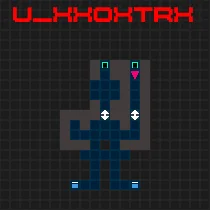
- Go through the hidden door and get both TCs
- East TC: "Revive.prg"
- West TC: "Healer.prg"
- Leave Backstage.
U_CR0037H (2):
- Head back to the Crypt.
Crypt B6F (2):
- Northwest TC: "Bone.amr"
- Head North through the dark area to reach the Ossuary.
- Go all the way West and up to make a shortcut I at B4F then use "Return.i".
Crypt B2F -> B6F:
- Heal at Healing Fountain.
- Head down to B4F through the normal means, then use the shortcut and the nearest stairs to get back down to B6F.
- Enter Ossuary by doing a diagonal strafe against the pillars to skip a cutscene with the guard.
Ossuary:
- ARCHETYPE: give Knight "Provoking Chord".
- ARCHETYPE: give Witch "Grimoire Reload".
- UNEQUIP:: all weapons! (OPTIONAL)
- EQUIP: Knight with "Healer.prg".
- EQUIP: Corrector with "Revive.prg" and "Bishop.prg".
- EQUIP: Paladin with "Priest.prg".
- EQUIP: Witch with "NightLight.opt".
- NOTE: You should equip this on whoever will be the fastest after Golden Machine acts during a turn. Generally, we put this on our 2nd fastest party member.
Boss 5: The Golden Machine
- Knight: Defends, uses "Medeoromni.r", Provokes
- Corrector: Keeps up Auto-Reboot on Witch and Oracle. When both are rebooted, casts Vis.
- Paladin: "Medeor.r" on frontline.
- Witch: T1 Grimoire Change to Vis, then spams "Magus Bullet"
- Oracle: "Glacies.d"
- When Golden Machine uses "Sirens Song" focus all your attention on using "Reboot.i" on all panicked party members. Panic is how you lose this fight!
| Key | Value |
|---|---|
| Name | |
| HP | 612 |
| Sprite | |